I occasionally conduct trainings on git and gerrit at my company. Using git is very easy, even for remote commands, there is GitHub, just cloning from another local directory, or even serving your own local repo on the network with git serve. Gerrit, on the other hand, requires a server somewhere to run it. This article describes the steps to setup a demo Gerrit server on an AWS EC2 instance (virtual private server) with HTTP authentication. NB: This guide is not for production usage.
Note: I run this server for a few days max on a month, so EC2 is cheaper than DigitalOcean. If you need to run it the whole month, the latter option is cheaper.
Note: you can do the same stuff (with fewer steps) to setup Gerrit on an Ubuntu virtual machine if you need to test it only locally.
Starting EC2 instance
This part is not described in details, but only the necessary steps are minimally explained. A detailed guide is here.
Go to https://aws.amazon.com/ and login/sign up. Now go to EC2 Console and pick a region at the top right corner or leave the default one (I think, it’s “US East (N. Virginia)” by default) — the prices may vary region to region.
Click “Key Pairs” in the left menu, in “Network & Security” section. I assume you have a generated SSH key pair, which use for git, and want to use it for the new server as well. Click “Import Key Pair”. In the opened dialog, pick your public key file (e.g., ~/.ssh/id_rsa.pub) and enter a name for it, say, “gerrit-demo-key”. Done, you’ll need the corresponding private key to access the new instance.
Click “Instances” in the left menu, then the “Launch Instance” button, you’ll see a wizard.
“Step 1: Choose an AMI”. I pick an ubuntu, which is an official image called “Ubuntu Server 14.04 LTS (HVM), SSD” at the moment of writing.
“Step 2: Choose an Instance Type”. If you have a new account, which was created less than a year ago, you have a free tier at AWS, in that case, pick type “t2.micro”. Otherwise, I pick “t2.nano”, which is cheaper.
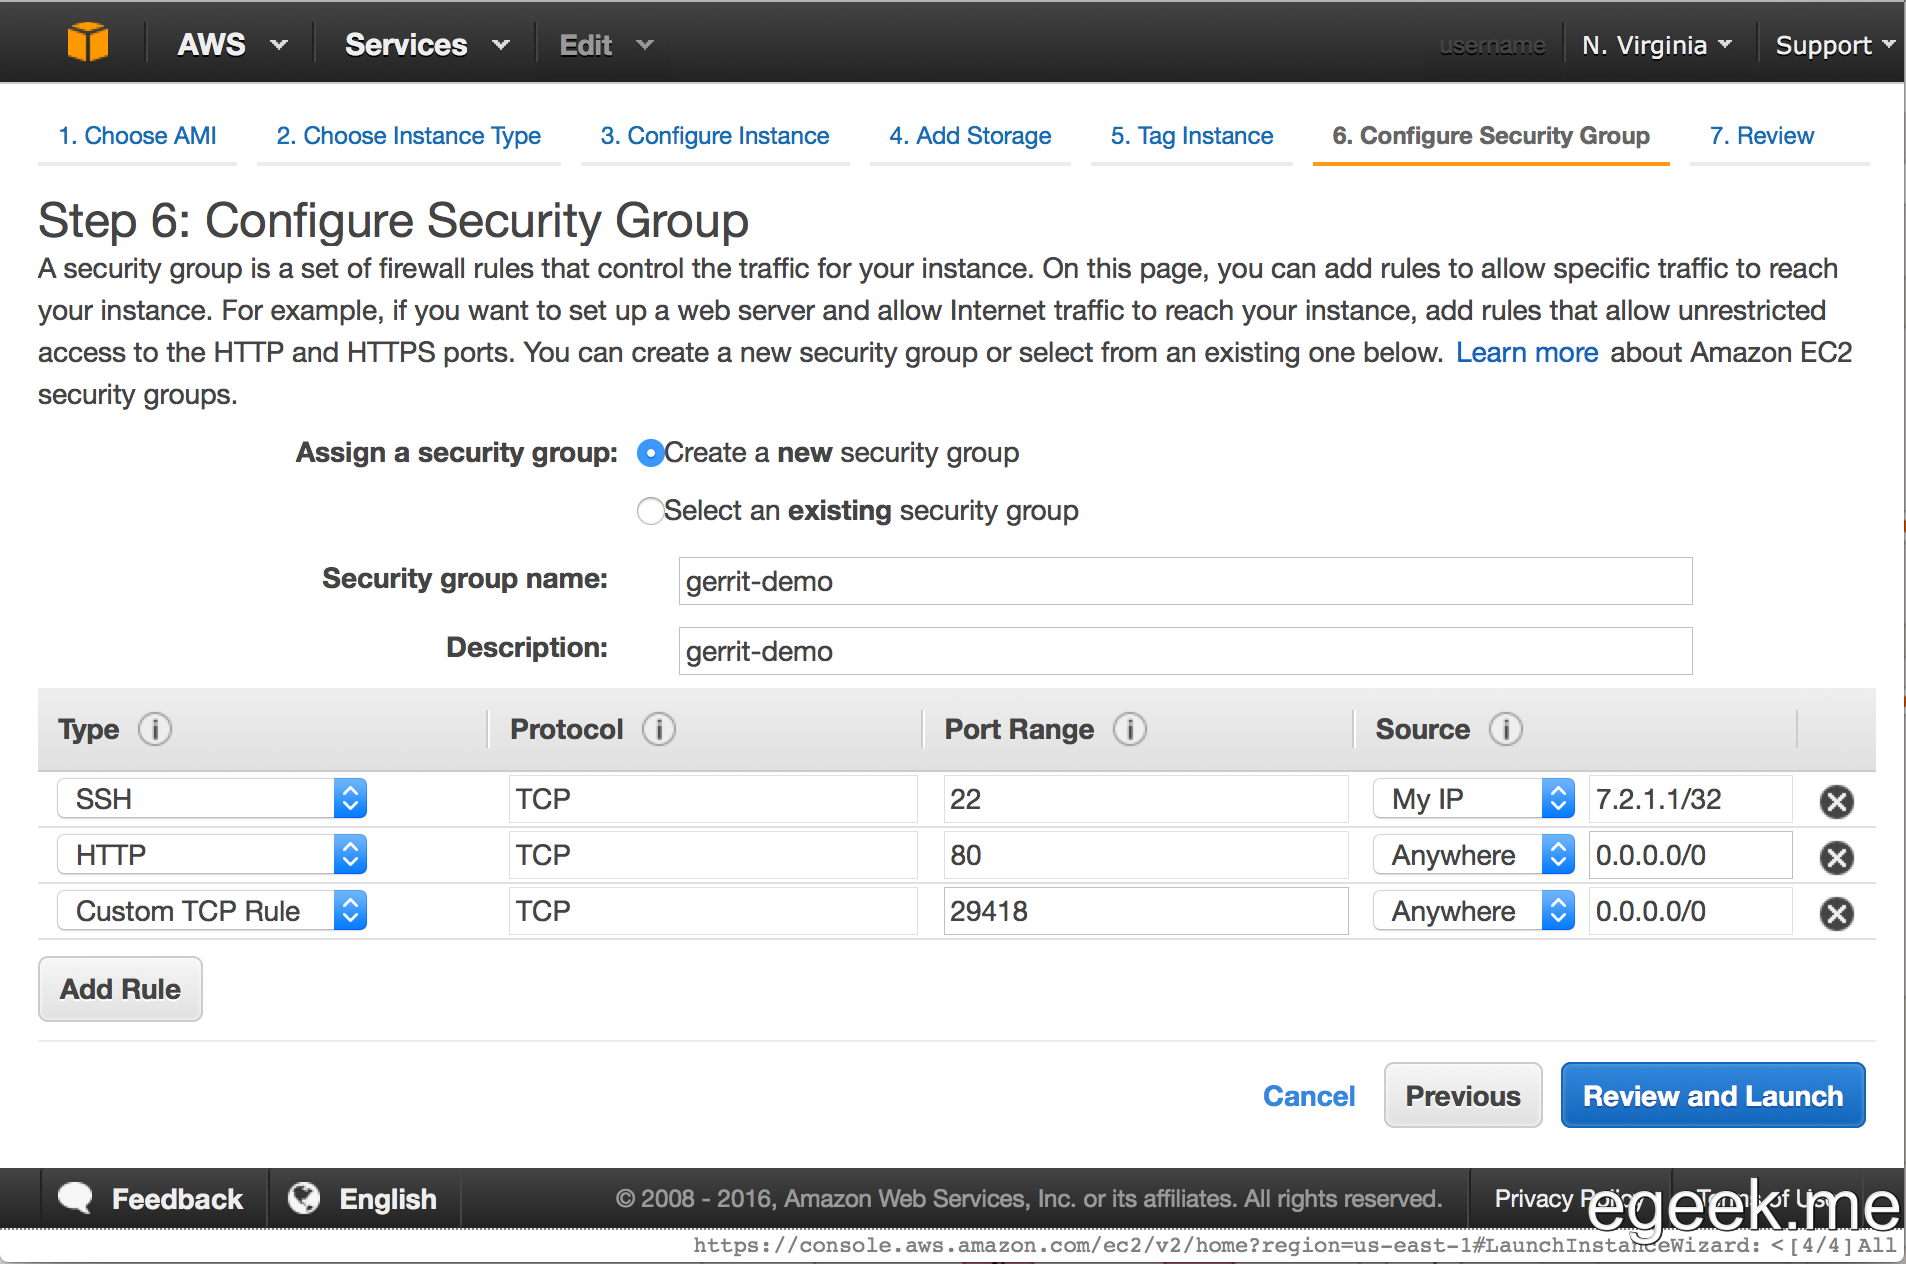
Click through to “Step 6: Configure Security Group”. Here, select “Create a new security group” to create a new set of allowing firewall rules. Enter a name like “gerrit-demo”. What we need to run the server is SSH (from My IP only, for security), HTTP (port 80, from everywhere), and Git (port 29418, from everywhere), the result should look like this:
Click “Review and Launch” button, then “Launch”. In the last dialog, select your imported key pair, “gerrit-demo-key” in our case, and finally launch the instance. It’ll take some time to actually start it. You can check the status by clicking the “Instances” link in left menu. One important setting we’ll need for the following steps is the server’s Public DNS (it changes between each instance restart), in my case it’s “ec2-54-173-2-2.compute-1.amazonaws.com”. Remember to change it to yours in all the steps below.
By default, Gerrit uses an external OpenID provider for authentication, but I don’t want to use any external service for the demo server. There is a special auth setting called “DEVELOPMENT_BECOME_ANY_ACCOUNT”, but it allows too much — any page visitor can become any user, which is really bad for a public gerrit server. The only viable option is to use HTTP Basic Authentication at the web server (we’ll use Apache 2). I didn’t find a complete working guide how to set it up, so this is why this guide exists. The basic idea is described here: https://gerrit-documentation.storage.googleapis.com/Documentation/2.12.2/config-sso.html#_http_basic_digest_authentication.
NB again: This setup is strictly NOT for production!
Login to the instance over ssh, my version on OSX 10.11 prints key hashes in SHA256, but the system log from the instance (on ubuntu 14.04) prints them in MD5, so we need use MD5 as well to verify the host key:
1234
$ ssh -o 'FingerprintHash=md5' ubuntu@ec2-54-173-2-2.compute-1.amazonaws.com
The authenticity of host 'ec2-54-173-2-2.compute-1.amazonaws.com (54.173.2.2)' can't be established.
ECDSA key fingerprint is MD5:e2:98:8d:4d:20:fc:1d:ca:24:fa:11:af:6b:ba:5b:c9.
Are you sure you want to continue connecting (yes/no)?
On the EC2 Instances page, right-click on your instance, select “Instance Settings” >> “Get System Log” (thanks to http://stackoverflow.com/a/24773982). At the end, find the host key fingerprints, in my case the matching one is ec2: 256 e2:98:8d:4d:20:fc:1d:ca:24:fa:11:af:6b:ba:5b:c9 root@ip-172-31-62-25 (ECDSA). Good, typing yes to the ssh, you should get a prompt.
It’s a good idea to update the system first with sudo apt-get update && sudo apt-get upgrade. We’ll skip creating a user for simplicity. Install the necessary packages, download and install gerrit:
Create user/pass for your first gerrit user with sudo htpasswd -c /etc/apache2/gerrit.passwd admin. In my case, I also create authentication for a bunch of users userN with the same password using this command:
123
ubuntu$ for i in$(seq 130);doecho user$i| sudo htpasswd -i /etc/apache2/gerrit.passwd user$i;doneubuntu$ sudo a2ensite 010-gerrit
ubuntu$ sudo service apache2 reload
Logout from ssh with Ctrl-D. Finally, you go to http://ec2-54-173-2-2.compute-1.amazonaws.com/ and login using admin credentials. You should see the gerrit interface after that.
Misc
To create a project, use the following command from your computer:
Using MD5 hash again to verify the server key, this time gerrit’s (it’s in “Settings” >> “SSH Public Keys” >> “Server Host Key”). If it says “Permission denied (publickey)”, you forgot to add your public key to your admin gerrit account.
One more thing: I add my demo users to a group to give them some extra permissions. But first, all the users should be created in gerrit (they are created on first login), so here is my hack:
12
$ for i in$(seq 130);do curl --basic -u "user$i":"user$i" http://ec2-54-173-2-2.compute-1.amazonaws.com/login/;done$ ssh -p 29418 admin@ec2-54-173-2-2.compute-1.amazonaws.com gerrit create-group $(for i in$(seq 130);doecho"--member user$i";done) devs
Bingo, the demo gerrit is alive and kicking! That’s it, folks! Any questions/comments? Leave a comment.